Stop motion is one of the coolest forms of filming techniques I’ve ever seen. Its no shock that when I began to teach myself the practice , I thought that it would be cool to show people how to make their own. Since many lessons on stop motion are quite advanced, I wanted to take on the challenge of making a How-To Video on how people can make their own. And boy was it an adventure.
Practicing Camera Angles and Shots
When I started this project, I had no clue where to turn to. Making a stop project and an explanation to new audiences would be tricky, but not impossible. But I needed to start somewhere. So for the readings this week, I read a bit and learned from our good old friend Tom Schroeppel, author of The Bare Bones Camera Course For Film and Video, and his chapters on the subject.
Bare Bones Chapter 3: The Basic Sequence
When first went in, I thought a single shot sequence in one place would be best. But oh was I wrong. having different camera shots is very important. Not only do multiple shots break up sequences but also create great visuals on screens. But Schroeppels got some rules.
For starters, have establishing shots. They help bring out where the audience is. You can also have a mix of wide shots and close ups, depending on the context of the shot. With a mix of cutaways and transitions, you can help break tension too.
Once you got all your shots, make sure you can enter or leave scene through shots. This signals that the sequence has began or ended, leaving everything off on a strong note.
Bare Bones Chapter 4: Screen Direction
Be careful though when you are shooting your scenes. There’s a very common rule in video work called don’t cross the line. This means that if you are going from a scene where things are not already previously established or in the line of a shot, then you don’t change to a different angle. This is also referred as the 180 rule.
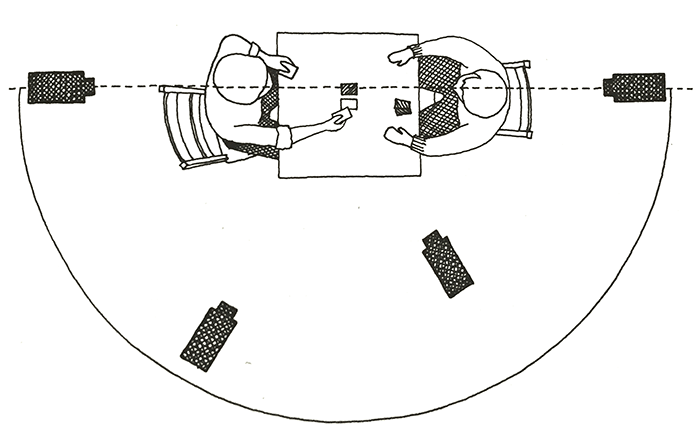
Look at this example above. The scene has two people talking. Each camera focused on one side. If there was another camera on the other side of the line, then that shot would create confusion because you don’t know that side yet. This line helps keep scene visually interesting without crossing the audience in unfamiliar territory .
And you can fix this problem with point of view shots or previously establishing shots, but still, keep this in mind when filming. If you can’t form angle A to B in a conversation, then you need to stay in the line.
A Shot Creates Interest In A Scene
It’s true. Multiple camera shots accomplish so much. They create interest on screen, cut up time between shots and can add to story elements. Multiple shots, plus proper cuts, make nothing boring, and you can notice a lot as you watch content. And sometimes the media is so good that you can’t even notice shot differences at first. Here are some of my favorites.
It’s the Same Knife: 12 Angry Men
12 men. One room. A decision that will change a young man’s life. 12 Angry Men has many great scenes, but It’s the Same Knife is one of the most important. In this scene, Juror #8 proves that the knife that was supposedly used to kill the victim isn’t unique. And his point makes Juror #9 change his vote.
Even though all the shots stay in the same room, this knife scene shows the intensity of the movie. Juror #8 is the only one in the scene who has voted not guilty. By having the close-ups and wide shots represent how vital information is, you are more invested in what’s going on despite limited movement and action. What an investing and well-shot movie.
We Both Reached For The Gun: Chicago
Sometimes, artsy comes when a shot tells a story. Look no further than We Both Reached For The Gun, from the movie Chicago. In the scene, Roxie (blond girl) is getting help from successful lawyer Billie (guy in the hat) in order to manipulate the press into thinking Roxie is innocent after murdering her husband.
The shots and cuts add so much to the scene. There are two major shot sequences, one in the real world press and one in the theatre of Roxie explaining herself through Billie’s made-up story. Despite being in two completely different locations, each cut is timed perfectly. You can tell that everything is happening in the real world, but that every theatre shot means his words are lying.
It’s an incredibly well-shot scene that explains things in its hectic environment.
Where’s Your Blade? The Battle of Helm’s Deep: The Lord of the Rings, The Two Towers
You’d think movies never mess up, but it’s true. The Two Towers of the lord of the Rings franchise is such a powerful series, but in the Battle of Helm’s Deep, one of the most impressive VFX shots I’ve ever seen, that came with a small and almost unnoticeable hiccup. Beginning at the 4:15 mark, Aragorn (black hair) leads the army by pulling his sword out of his hilt. Then you follow the rest of the battle out with your normal cuts.
There is a problem though. Look on the left below.


When you slow the clip down, his sword isn’t a part of the shot, only the hilt. This was common for many complex VFX shots like Helm’s Deep, where actors used only handles or bows, then added the sword blades and arrows back into scenes. On the right, you can see what the sword is supposed to look like, with his sword in frame again at the 5:38 mark.
The fact that 1. The shot has so much in it that you don’t even notice 2. He moves his blade down quickly, and 3. that the shot cuts so fast because it’s no longer focused on Aragorn, but now the oncoming battle. This clip shows that even when a mistake exists, well-timed cuts and framing can help ignore such small details.
Creating Your Own Stop Motion Process
I learned a lot from this project. For starters, a project like this requires a lot of planning and a lot of backup plans. You are going from shot to shot making sure that everything feels like its happening at the same time. If you plan properly, recording and editing go smoothly.
I also cut myself a bit of slack on this project, especially when it came to messing up. Making your stop motion can be really fun but also really taxing. And when I messed up in some shots, I was so frustrated because I was so worried redoing everything that I neglected just having making silly, imperfect stop motion.
Finally, I learned to appreciate the work normal how-to videos do. Many are so well edited and while the how-to may not take that long to create, getting a look at the physical process of filming, editing and explaining the content in a fun and engaging way really shows how much work users do, and for that, I really think we should love those videos that taught us sill hacks and important life skills.
This was a really fun project, and I hope to do more like them in the future! Have a great day and here’s my video!

Leave a comment